


Buckle Up, Gearheads! A Journey Back in Time: The Ultimate Guide to Restoring a 1959 English Ford Anglia (Before It’s Too Late!)
Imagine a time when cars were sculpted, not just designed. When chrome gleamed under sunny skies, and a car’s personality was as important as its performance. That time, my friends, is the era of the 1959 English Ford Anglia – a vehicle that embodies a unique blend of British charm, quirky design, and a touch of rebellious spirit. And if you’re reading this, chances are you’ve caught the bug, the nostalgic fever, the undeniable allure of bringing one of these automotive icons back to life.
This isn’t just another guide. This is a lifeline. “The Ultimate Guide to Restoring a 1959 English Ford Anglia (Before It’s Too Late!)” is more than just a collection of how-to instructions; it’s a comprehensive roadmap, a passionate plea, and a celebration of the remarkable journey of restoring a classic car that is slowly, but surely, vanishing from our roads and garages.
Why is this guide so important?
The 1959 English Ford Anglia wasn’t just a car; it was a cultural touchstone. It represented a post-war Britain embracing modernity, a time of optimism and innovation. It was a symbol of practicality, reliability (relatively speaking!), and a distinctively British aesthetic. But with the passage of time, these charming little cars are facing a harsh reality: neglect, rust, and the slow, insidious march of entropy.
Here’s the stark truth: Fewer and fewer Anglias remain in drivable condition. Parts are becoming increasingly scarce. The knowledge and expertise needed to revive these beauties are dwindling with each passing year. This guide exists because we believe that these cars deserve to be preserved. They deserve to be seen again, heard again, and enjoyed again. They deserve to be saved before it truly is too late.
What will you discover in this guide?
We’ll take you on a complete journey, from the initial spark of inspiration to the triumphant moment of driving your restored Anglia down the road. We’ll cover everything you need to know, including:
- A deep dive into the history of the 1959 English Ford Anglia: Understand its origins, its design, and its place in automotive history.
- Finding and Assessing Your Anglia: Learn how to locate a suitable candidate, evaluate its condition, and determine the scope of the restoration project.
- The Crucial First Steps: Disassembly, documentation, and establishing a solid foundation for your restoration.
- Bodywork Blues and Beautiful Finishes: Mastering rust repair, panel replacement, and achieving a stunning paint job.
- Engine Revival: Detailed instructions on rebuilding and maintaining the Anglia’s iconic engine, ensuring it purrs like a kitten (or at least, a slightly grumpy one!).
- Chassis and Suspension Overhaul: Ensuring a safe and comfortable driving experience, including brakes, steering, and suspension components.
- Interior Transformation: Recreating the Anglia’s charming interior, from upholstery to dashboard details.
- Electrical Wizardry: Troubleshooting and restoring the Anglia’s electrical system, ensuring lights, instruments, and accessories function correctly.
- Sourcing Parts and Resources: Navigating the world of Anglia parts, finding reliable suppliers, and connecting with the passionate community of enthusiasts.
- Tips, Tricks, and Troubleshooting: Avoiding common pitfalls, overcoming challenges, and learning from the experiences of other restorers.
- And finally, the Celebration! The pride and joy of finally cruising in your beautifully restored 1959 English Ford Anglia.
Background Context: A Brief History of the Anglia
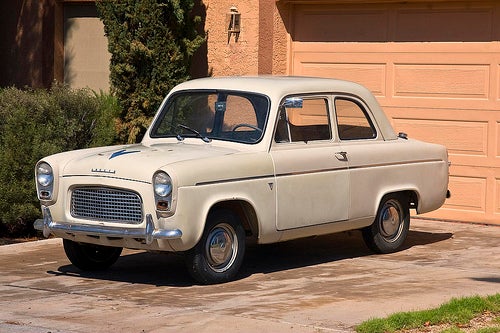
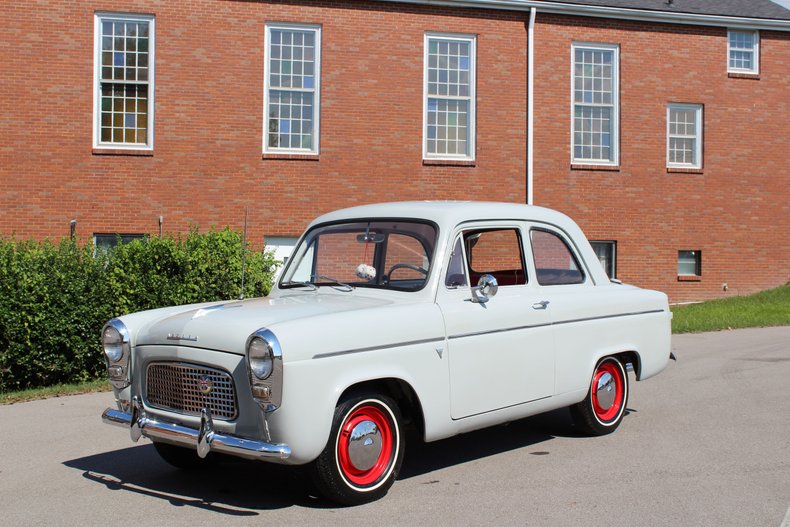
The 1959 English Ford Anglia, specifically the 105E model, was a groundbreaking car for its time. Introduced in 1959, it featured a radical “reverse rake” rear window, a styling cue that immediately set it apart from its contemporaries. This distinctive feature, along with its compact size and surprisingly spacious interior, quickly captured the hearts of drivers and enthusiasts alike.
It was powered by a reliable, albeit modest, 997cc inline-four engine. While not a performance powerhouse, the Anglia was known for its fuel efficiency and ease of maintenance. It was a car built for everyday practicality, a vehicle that connected with the average British family.
The Anglia’s legacy extends beyond its practicality. It became a pop culture icon, famously featured in the Harry Potter films (in the hands of the Weasley family). It represented a shift in automotive design, a departure from the boxy, post-war aesthetics.
So, are you ready to embark on this extraordinary adventure? Are you ready to breathe new life into a piece of automotive history? Then let’s get started. Let’s save the 1959 English Ford Anglia, one bolt, one panel, one glorious drive at a time!
The Ultimate Guide to Restoring a 1959 English Ford Anglia (Before It’s Too Late!)
The 1959 English Ford Anglia, with its iconic reverse-slanted rear window and charming simplicity, holds a special place in automotive history. Restoring one is a rewarding experience, but it’s a project that requires patience, dedication, and a healthy dose of mechanical know-how. This guide will walk you through the process, from initial assessment to the final drive, ensuring you’re equipped to bring this classic back to its former glory. And the “Before It’s Too Late!” part is crucial: Anglias are becoming increasingly rare, and the longer you wait, the more difficult and potentially expensive the restoration will become.
I. Understanding the Anglia: A Foundation for Success
Before diving into the physical work, you need a solid understanding of the Anglia itself. This knowledge will inform your decisions and help you avoid costly mistakes.
A. The Anglia’s History and Significance:
- Origins: Produced by Ford of Britain, the Anglia was designed to be a compact, affordable car for post-war Britain. It was a practical and economical vehicle, offering a surprising amount of space for its size.
- Key Features: The most distinctive feature is undoubtedly the reverse-slanted rear window (often called a “reverse-rake” or “back-sloping”) which was an aerodynamic experiment that proved unpopular initially but became an iconic design element. Other notable features include:
- Engine: A 997cc (later 1198cc) inline-four side-valve engine, initially producing around 36 horsepower.
- Transmission: A four-speed manual transmission.
- Suspension: Independent front suspension with coil springs, and a live axle with leaf springs at the rear.
- Brakes: Drum brakes on all four wheels.
- Why Restore an Anglia? Beyond the historical significance, restoring an Anglia offers:
- A Unique Driving Experience: Simple mechanics and a light chassis make for an engaging and surprisingly nimble driving experience.
- Appreciating Value: Well-restored Anglias are increasingly sought-after by collectors, offering potential for investment.
- Community and Camaraderie: The Anglia has a dedicated following, offering access to clubs, parts, and support networks.
- A Rewarding Challenge: The restoration process itself is a satisfying journey, fostering a deep connection with the car.
B. Identifying Your Anglia:
- Chassis Number: This is the most important identifier. It’s usually located on the chassis rail, often near the front suspension. It will tell you the car’s year, model, and manufacturing details. Research the chassis number to verify its authenticity and original specifications.
- Engine Number: Found on the engine block. This helps confirm the engine’s original configuration.
- Body Style: The 1959 Anglia was primarily a two-door sedan.
- Original Features: Knowing the original features (interior trim, color, etc.) will help you with the restoration process and ensure authenticity. Research the specifications for your specific model year.
C. Common Problems and Weaknesses:
Understanding the Anglia’s vulnerabilities is crucial for planning and budgeting.
- Rust: This is the Anglia’s biggest enemy. Pay close attention to:
- Floor Pans: Often rusted through.
- Sills (Rockers): Prone to rust from water and debris.
- Wheel Arches: Rust can eat away from the inside out.
- A-Pillars: Rust can compromise structural integrity.
- Boot (Trunk) Floor: Rust can occur from water leaks and poor drainage.
- Doors and Fenders: Rust is common, especially around the edges and lower sections.
- Mechanical Issues:
- Engine Wear: Engines can suffer from worn cylinders, valves, and crankshafts.
- Transmission Problems: Gearboxes can be worn, making shifting difficult.
- Brake System: Drum brakes are prone to wear and require regular maintenance.
- Electrical System: Wiring can deteriorate with age, leading to shorts and malfunctions.
- Availability of Parts: While the Anglia has a dedicated following, some parts can be difficult to find and/or expensive. Plan ahead and source parts early.
II. The Restoration Process: A Step-by-Step Guide
This section outlines the key steps involved in restoring your Anglia.
A. Assessment and Planning:
- Detailed Inspection: Thoroughly inspect the car, documenting every detail. Take photos and videos to record the condition of each component. Create a checklist to track your progress.
- Prioritize Repairs: Identify the areas that require immediate attention (structural rust, mechanical failures).
- Set a Budget: Estimate the cost of parts, materials, and labor (if you’re using a professional). Be realistic – restoration costs often exceed initial estimates.
- Create a Timeline: Break down the project into manageable phases and set deadlines. Account for potential delays.
- Research and Documentation: Gather repair manuals, parts catalogs, and information about your specific model year. Document everything you do, including photos, notes, and receipts.
B. Disassembly:
- Safety First: Disconnect the battery. Wear appropriate safety gear (gloves, eye protection). Work in a well-ventilated area.
- Remove Exterior Components: Start with the easy stuff: bumpers, trim, lights, badges, and interior components (seats, carpets, headliner). Label and bag all parts.
- Remove the Engine and Transmission: This is a complex process. Drain fluids, disconnect wiring, and carefully detach the engine and transmission from the chassis. Consider renting an engine hoist.
- Strip the Body: Remove the fenders, doors, hood, and trunk lid. Carefully disconnect any wiring or linkages.
- Remove Suspension and Brakes: Detach the suspension components (shocks, springs, control arms, axles) and the braking system (brake lines, master cylinder, wheel cylinders).
- Sandblast or Chemical Stripping: This is the most effective way to remove paint, rust, and contaminants from the body and chassis. Choose the method based on your budget and available resources. Sandblasting can be done at home, but chemical stripping is often more suitable for delicate parts.
- Chassis Preparation: If the chassis is rusty, it will need to be repaired or replaced. This is a critical step for structural integrity.
C. Bodywork and Rust Repair:
- Rust Removal: Cut out all rusted metal. Use a grinder, angle grinder, or spot welder to remove rusted sections.
- Panel Fabrication: If you’re skilled, fabricate replacement panels from sheet metal. Alternatively, purchase pre-made repair panels.
- Welding: Weld the new panels in place. Ensure the welds are clean and strong. Grind the welds smooth.
- Body Filling: Apply body filler (Bondo or similar) to smooth out imperfections and minor dents. Sand the filler smooth.
- Priming: Apply a high-quality epoxy primer to protect the bare metal from rust. Follow the manufacturer’s instructions for application and curing.
D. Mechanical Restoration:
- Engine Overhaul: Disassemble the engine completely. Inspect all components for wear and damage. Replace worn parts (pistons, rings, bearings, valves, etc.). Machine the engine block and cylinder head as needed. Reassemble the engine, using a torque wrench to tighten bolts to the correct specifications.
- Transmission Rebuild: Disassemble the transmission. Inspect all gears, bearings, and seals. Replace worn parts. Reassemble the transmission, following the repair manual.
- Brake System Restoration: Overhaul the brake system. Replace brake shoes, wheel cylinders, master cylinder, and brake lines. Ensure the brakes are properly bled.
- Suspension Rebuild: Replace worn bushings, ball joints, and shock absorbers. Inspect the springs and axles.
- Fuel System: Clean the fuel tank, replace the fuel pump, and rebuild the carburetor.
E. Paint and Bodywork:
- Body Preparation: Sand the primed body to create a smooth surface for painting. Address any remaining imperfections.
- Paint Application: Choose a paint type (single-stage, basecoat/clearcoat) and color. Apply the paint in a clean, dust-free environment. Follow the manufacturer’s instructions for application and curing. Consider having the painting done professionally if you lack experience.
- Wet Sanding and Polishing: Wet sand the paint to remove imperfections and achieve a smooth, glossy finish. Polish the paint to enhance its shine.
F. Reassembly:
- Chassis Assembly: Reassemble the suspension, brakes, and other chassis components.
- Engine and Transmission Installation: Carefully install the engine and transmission into the chassis.
- Body Installation: Mount the body onto the chassis.
- Interior Installation: Install the interior components (seats, carpets, headliner, door panels).
- Wiring: Reinstall the wiring harness. Test the electrical system to ensure everything functions correctly.
- Exterior Assembly: Install the fenders, doors, hood, trunk lid, bumpers, trim, and lights.
G. Testing and Tuning:
- Fluid Filling: Fill the engine with oil, coolant, and other fluids.
- First Start: Start the engine. Check for leaks.
- Break-in: Follow the break-in procedure recommended by the engine builder.
- Road Testing: Test drive the car. Check for any mechanical or performance issues.
- Fine-Tuning: Adjust the carburetor, ignition timing, and other components to optimize performance.
III. Benefits of Restoring an Anglia:
Beyond the personal satisfaction, restoring an Anglia provides numerous benefits:
- Preservation of Automotive History: You’re contributing to the preservation of a classic car and its heritage.
- Investment Potential: A well-restored Anglia can appreciate in value.
- Skill Development: You’ll learn valuable mechanical and restoration skills.
- Community and Camaraderie: Join the Anglia community and share your passion.
- Unique Driving Experience: Enjoy the thrill of driving a classic car.
- Sense of Accomplishment: The satisfaction of bringing a classic car back to life is immense.
IV. Important Details and Considerations:
- Sourcing Parts: Research reliable suppliers for parts. Consider online marketplaces, specialist parts dealers, and Anglia clubs. Be prepared for potential delays and sourcing challenges.
- Tools and Equipment: Invest in the necessary tools. This includes wrenches, sockets, screwdrivers, a torque wrench, a grinder, a welder (or access to one), and a paint sprayer.
- Workspace: You’ll need a clean, well-lit, and organized workspace. A garage or workshop is ideal.
- Time Commitment: Restoration is time-consuming. Be prepared to dedicate many hours to the project.
- Budget Management: Track all expenses carefully. Be prepared to adjust your budget as needed.
- Professional Help: Don’t hesitate to seek professional help for tasks you’re not comfortable with (welding, painting, engine machining).
- Safety: Prioritize safety throughout the restoration process. Wear appropriate safety gear and follow safe working practices.
- Documentation: Keep detailed records of your progress, including photos, videos, and receipts. This documentation will be valuable for future reference and for showcasing your restoration.
V. The Anglia’s Future: Preserving a Legacy
Restoring a 1959 English Ford Anglia is a significant undertaking, but the rewards are substantial. By following this guide, you’ll be well-equipped to tackle the project and bring this charming classic back to life. Remember, the Anglia is a piece of automotive history that deserves to be cherished. Don’t delay – start your restoration journey now, and ensure that the Anglia continues to grace our roads for generations to come. Good luck, and enjoy the process! The thrill of the drive, the camaraderie of the club, and the satisfaction of a job well done will make the effort worthwhile.
The Ultimate Guide to Restoring a 1959 English Ford Anglia: FAQ
This FAQ section is designed to answer your burning questions about restoring a 1959 English Ford Anglia, based on the principles and advice found within “The Ultimate Guide to Restoring a 1959 English Ford Anglia (Before It’s Too Late!).”
General Questions & Introduction
Q: Why restore a 1959 English Ford Anglia? A: The 1959 Anglia is a charming and iconic classic car, known for its distinctive styling, affordability, and relatively simple mechanics. Restoring one offers a rewarding experience, a chance to preserve automotive history, and a fun, head-turning vehicle for enjoyment. Furthermore, the market for restored Anglias is growing, potentially offering a good return on investment.
Q: What makes this guide different from other restoration guides? A: This guide focuses specifically on the 1959 English Ford Anglia and emphasizes tackling the restoration before the car deteriorates beyond repair. It provides detailed, step-by-step instructions, practical advice, and addresses common pitfalls specific to this model. It also stresses the importance of preventative measures and sourcing parts efficiently.
Q: Is restoring an Anglia a realistic project for a beginner? A: While a complete restoration can be challenging, the Anglia’s relatively simple design makes it a good candidate for a beginner. The guide provides clear explanations and breaks down complex tasks into manageable steps. However, a degree of mechanical aptitude and a willingness to learn are essential. Starting with a less-damaged car is highly recommended.
Q: Where can I find a 1959 English Ford Anglia to restore? A: Consider these options:
- Online Auctions & Classifieds: eBay, classic car websites, and online marketplaces are great starting points.
- Classic Car Clubs: Join a local or national Anglia club. Members often know about cars for sale and can offer valuable advice.
- Car Shows & Swap Meets: These events are excellent for finding potential projects and connecting with other enthusiasts.
- Word of Mouth: Let people know you’re looking! Someone might know of an Anglia hidden in a barn.
Q: How much will it cost to restore a 1959 English Ford Anglia? A: The cost varies greatly depending on the car’s condition, the level of restoration (e.g., bodywork, engine rebuild, interior refurbishment), and whether you do the work yourself or hire professionals. Budget realistically, factor in unexpected expenses, and always research parts prices beforehand. A good starting point is to assume the cost of the car itself, plus a similar amount for parts and materials, and then add a significant buffer for labor (if applicable).
Q: How long will it take to restore an Anglia? A: Restoration time can range from several months to several years, depending on the scope of the project, your available time, and the availability of parts. This guide emphasizes the importance of planning and breaking the project into smaller, achievable milestones.
Planning & Preparation
Q: What should I look for when inspecting a potential Anglia project car? A: Crucial areas to inspect include:
- Bodywork: Rust is the Anglia’s enemy. Check the floors, sills, wheel arches, chassis, and around the windows.
- Engine: Assess the engine’s condition by checking compression, looking for leaks, and listening for unusual noises.
- Mechanicals: Examine the brakes, suspension, steering, and transmission for wear and tear.
- Interior: Evaluate the condition of the seats, dashboard, and headliner.
- Documentation: Verify the car’s history, including ownership and service records.
Q: What tools and equipment will I need? A: Essential tools include:
- Basic Hand Tools: Wrenches, sockets, screwdrivers, pliers, hammers, etc.
- Specialized Tools: Torque wrench, compression tester, timing light, etc.
- Bodywork Tools: Welding equipment, sandblaster, body hammers, dollies, etc.
- Safety Equipment: Safety glasses, gloves, respirators, etc.
- Space: A well-lit, covered workspace is crucial.
Q: What is the importance of creating a restoration plan? A: A well-defined plan prevents scope creep, helps manage costs, and keeps you on track. The guide emphasizes:
- Prioritizing Tasks: Identify the most critical areas to address first.
- Setting Realistic Goals: Break down the project into smaller, achievable steps.
- Budgeting: Track expenses meticulously and adjust as needed.
- Sourcing Parts: Identify reliable suppliers and understand lead times.
Q: Where can I find parts for my Anglia? A: Key sources for parts include:
- Specialist Anglia Parts Suppliers: Numerous companies specialize in Anglia parts.
- Online Marketplaces: eBay, classified ads, and online forums can be excellent resources.
- Classic Car Clubs: Members often have parts for sale or can point you in the right direction.
- Scrap Yards: Sometimes, you can find usable parts from other classic cars.
Bodywork & Rust Repair
Q: How do I deal with rust on my Anglia? A: Rust repair is often the most time-consuming and challenging aspect of the restoration. The guide advises:
- Assessing the Damage: Identify the extent of the rust and the areas affected.
- Removing Rust: Methods include sandblasting, chemical stripping, or using a wire brush.
- Cutting Out Rust: Remove severely rusted panels and replace them with new or repaired metal.
- Welding: Learn to weld or hire a professional to ensure strong, lasting repairs.
- Preventing Future Rust: Apply rust inhibitors, undercoating, and proper paint protection.
Q: What type of welding is best for restoring an Anglia? A: MIG (Metal Inert Gas) welding is generally recommended for its ease of use and versatility. However, TIG (Tungsten Inert Gas) welding can provide more precise results, especially for thin-gauge steel.
Q: What are the most common rust areas on the 1959 Anglia? A: The most vulnerable areas are:
- Floor Pans: Especially at the footwells.
- Sills (Rockers): The lower panels along the sides.
- Wheel Arches: Both inner and outer arches.
- Chassis: The underside of the vehicle.
- Windscreen Surround: Around the front and rear windows.
Engine & Mechanicals
Q: What are the common engine issues with the 1959 Anglia? A: Common issues include:
- Worn Bearings: Leading to engine knocking.
- Oil Leaks: From seals and gaskets.
- Weak Compression: Due to worn piston rings or valve issues.
- Overheating: Caused by a clogged radiator or faulty water pump.
Q: Should I rebuild the original engine or swap it for a more modern one? A: The decision depends on your goals:
- Originality: Rebuilding the original engine preserves the car’s authenticity.
- Performance: A modern engine swap can significantly improve performance, but it will compromise originality.
- Budget: Rebuilding the original engine can be expensive, but a swap also requires additional parts and modifications.
Q: How do I rebuild the Anglia’s engine? A: The guide provides detailed instructions on engine disassembly, cleaning, inspection, reassembly, and testing. This includes:
- Disassembly & Cleaning: Carefully documenting the process and cleaning all components.
- Component Inspection: Assessing the condition of the crankshaft, camshaft, pistons, valves, etc.
- Machining: Having worn parts machined or replaced.
- Reassembly: Following the correct torque specifications and using new gaskets and seals.
- Running-in: Following a proper running-in procedure after the rebuild.
Q: What are the common issues with the Anglia’s brakes and suspension? A: Common issues include:
- Worn Brake Shoes/Pads: Reducing braking performance.
- Leaking Wheel Cylinders: Leading to brake fluid loss.
- Worn Suspension Bushes: Causing poor handling and ride quality.
- Corroded Brake Lines: Leading to brake failure.
Interior & Trim
Q: How do I restore the Anglia’s interior? A: Interior restoration involves:
- Removing the Old Interior: Carefully removing seats, carpets, headliners, and door panels.
- Repairing or Replacing Seats: Replacing foam, springs, and upholstery.
- Replacing Carpets: Cutting and fitting new carpets.
- Restoring the Dashboard: Cleaning, repairing, and refinishing the dashboard.
- Replacing the Headliner: Installing a new headliner.
- Refurbishing Door Panels: Repairing or replacing door panels and trim.
Q: How do I find the correct interior materials? A: Specialist suppliers offer accurate reproductions of the original materials, including seat fabric, carpets, and headliners. The guide emphasizes the importance of sourcing quality materials for a professional finish.
Painting & Finishing
Q: What type of paint is best for the Anglia? A: Modern two-pack paints (2K) are generally recommended for their durability and gloss. However, single-pack paints offer a more authentic look.
Q: Should I paint the car myself or hire a professional? A: Painting requires specialized equipment, skills, and a dust-free environment. Unless you have experience, hiring a professional is usually the best option for achieving a high-quality finish.
Q: What are the steps involved in painting the Anglia? A: The guide outlines the painting process:
- Preparation: Bodywork repairs, rust removal, priming, and sanding.
- Painting: Applying base coat, color coat, and clear coat (if using 2K).
- Polishing: Buffing and polishing the paint to achieve a mirror-like finish.
Common Misconceptions
Q: Restoring an Anglia is always cheaper than buying a restored one. A: Not necessarily. Unless you are doing the work yourself and are good at sourcing parts, the cost can quickly escalate. Always factor in the value of your time and the potential for unexpected expenses.
Q: All parts are readily available. A: While many parts are available, some can be hard to find or expensive. Thorough research and planning are crucial.
Q: Rust can be easily hidden. A: Hiding rust is a temporary fix that will ultimately lead to more serious problems. Proper rust removal and repair are essential for a lasting restoration.
Q: Restoring an Anglia is a fast process. A: Restoration takes time and patience. Set realistic expectations and break the project into manageable steps.
Q: Any mechanic can work on an Anglia. A: While the Anglia’s mechanics are relatively simple, experience with classic cars is beneficial. Specialist knowledge can save time and money.
Q: I can skip steps to save time and money. A: Cutting corners often leads to problems down the road. Follow the guide’s instructions and don’t compromise on quality to ensure a successful and lasting restoration.
This FAQ provides a solid foundation for understanding the challenges and rewards of restoring a 1959 English Ford Anglia. Remember to consult “The Ultimate Guide to Restoring a 1959 English Ford Anglia (Before It’s Too Late!)” for detailed instructions, practical advice, and invaluable insights to help you bring this classic car back to its former glory. Good luck!
Conclusion: Reviving a Legend - Your Anglia Awaits!
We’ve journeyed together through the intricate world of restoring a 1959 English Ford Anglia, from the initial assessment of its battered beauty to the triumphant moment of its revitalized roar. We’ve navigated the challenges, celebrated the victories, and equipped ourselves with the knowledge and resources necessary to breathe new life into this iconic classic.
A Recap of the Road Traveled:
We began by understanding the importance of thorough planning and research, highlighting the significance of finding the right vehicle, establishing a realistic budget, and sourcing reliable parts. We then delved into the core restoration stages:
- Disassembly and Assessment: Carefully documenting every step, meticulously removing components, and identifying areas of rust and damage.
- Bodywork and Paint: Mastering rust removal techniques, choosing the right paint, and achieving a flawless finish, showcasing the Anglia’s distinctive lines.
- Mechanical Restoration: Overhauling the engine, transmission, brakes, and suspension, ensuring the car’s performance and safety.
- Interior Refurbishment: Reupholstering seats, replacing carpets, and restoring the dashboard, bringing the Anglia’s interior back to its original glory.
- Electrical System Upgrade: Addressing wiring issues, ensuring proper functionality of lights, gauges, and other electrical components.
- Reassembly and Detailing: Meticulously putting everything back together, paying attention to the smallest details, and achieving a showroom-worthy result.
Throughout this guide, we emphasized the importance of patience, perseverance, and a passion for the project. We stressed the value of seeking expert advice when needed, embracing online communities, and celebrating each milestone along the way.
Final Thoughts:
Restoring a 1959 English Ford Anglia is more than just a project; it’s a journey. It’s a chance to connect with history, learn valuable skills, and experience the satisfaction of creating something beautiful and lasting. This guide is not just about the technical aspects of restoration; it’s about the emotional investment, the dedication, and the sheer joy of seeing this iconic vehicle come back to life. The Anglia represents a time of innovation and charm, and by restoring one, you become a custodian of its legacy.
Actionable Takeaways:
- Start Small: Don’t be overwhelmed. Break the project into manageable phases.
- Prioritize Rust Removal: It’s the foundation of a successful restoration.
- Document Everything: Take photos and notes at every stage.
- Build a Network: Connect with other Anglia enthusiasts for support and advice.
- Source Parts Strategically: Research suppliers and compare prices.
- Embrace the Learning Curve: Every challenge is an opportunity to grow.
- Don’t Give Up: The rewards are worth the effort.
Next Steps: Your Anglia Adventure Begins Now!
Now that you’re armed with the knowledge and inspiration, it’s time to take action! Dust off those tools, clear out your garage, and begin your own Anglia restoration adventure. The clock is ticking, but the opportunity to preserve this piece of automotive history is yours. Find your Anglia, start your research, and take the first step – the road to revival awaits! Let’s bring these beautiful machines back to life, one bolt, one panel, one glorious drive at a time. Good luck, and happy restoring!
